")
How to install AR15 Lower Parts Kit (Complete Guide w/ Pictures!)
80 Percent Arms | Jan 12th 2022
Welcome to our complete guide for how to install an AR 15 lower parts kit! If this is your first time, make sure you have all your parts and tools ready to go so you can have a smooth build process. It makes things less hectic and helps save time too. If you’ve been around the block before and this isn’t your first time, maybe you’re just needing a reminder for some steps — this guide will serve you well.
Tools needed for AR 15 lower parts kit install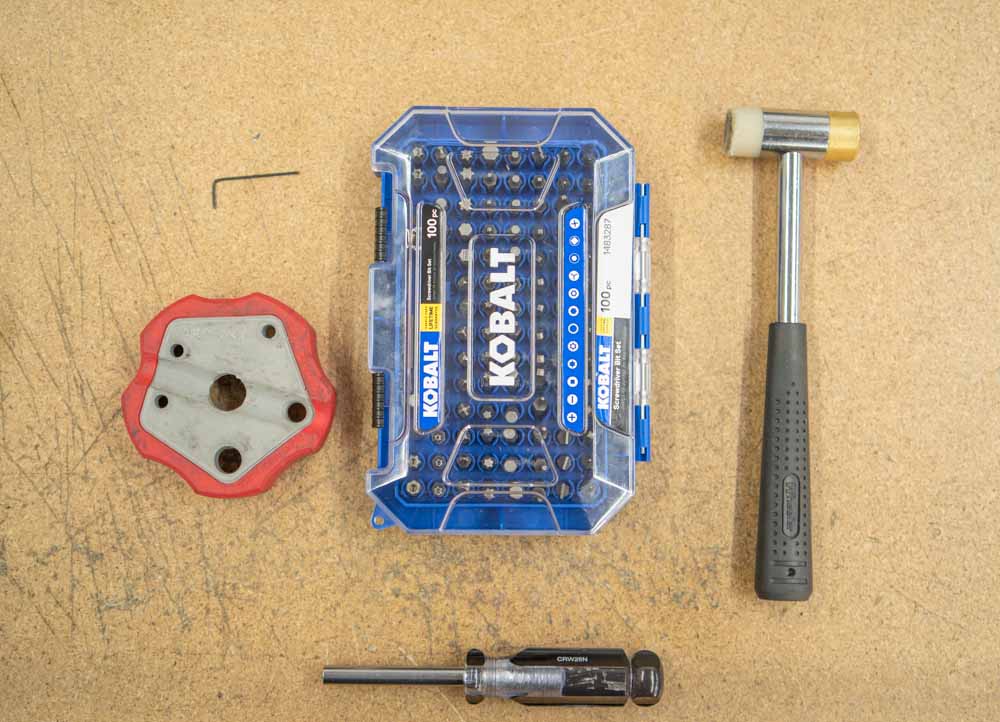
Have an easier time installing your lower parts kit by getting all your ducks in row by gathering the following tools:
-Hammer block (We use the magnetic bench block from Real Avid)
-Gunsmithing hammer (should have a nylon end and a metal end)
-We used a drill bit screwdriver set from Kobalt but these are what you’d need individually:
-Torx screwdriver
-Flat head screwdriver
-Hex screwdriver
-Allen key (find the thinnest one possible)
-Brass punch (doesn’t have to be brass, that’s just what we use)
Parts needed for AR 15 LPK
Within a typical AR15 lower part kit you should have the following mil-spec parts below. Keep in mind, almost every part should come with a detent, spring or pin for it to be installed.
-Fire control group (trigger and its respective spring along with locking pins)
-Bolt catch
-Magazine catch and release button
-Buffer retainer
-Fire/Safe selector
-Trigger guard
-Takedown pins
-A2 pistol grip (most AR15 LPK will include this, others won’t)
Buffer System Parts
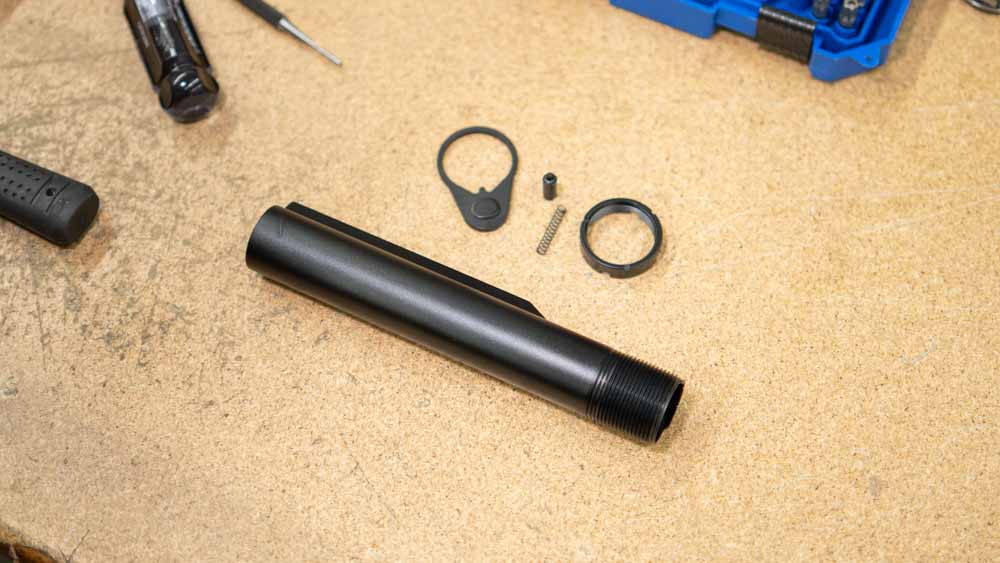
As a bonus, if you want to finish the entire lower receiver in one go, make sure to also get a buffer tube kit or its respective parts to be completely done with this installation. The reason we bring this up is because all lower parts kits have the buffer retainer kit. Personally, I find it frustrating that we all have to purchase the buffer system parts separately when part of it lies within the AR15 LPK. However, this is all by design as it gives builders the option to customize the choice of their parts more and helps save some cost in the overall budget. Sometimes, all you need is the AR15 LPK and not anything else.
-Buffer tube
-Buffer spring
-Buffer weight
-End plate
-Castle nut
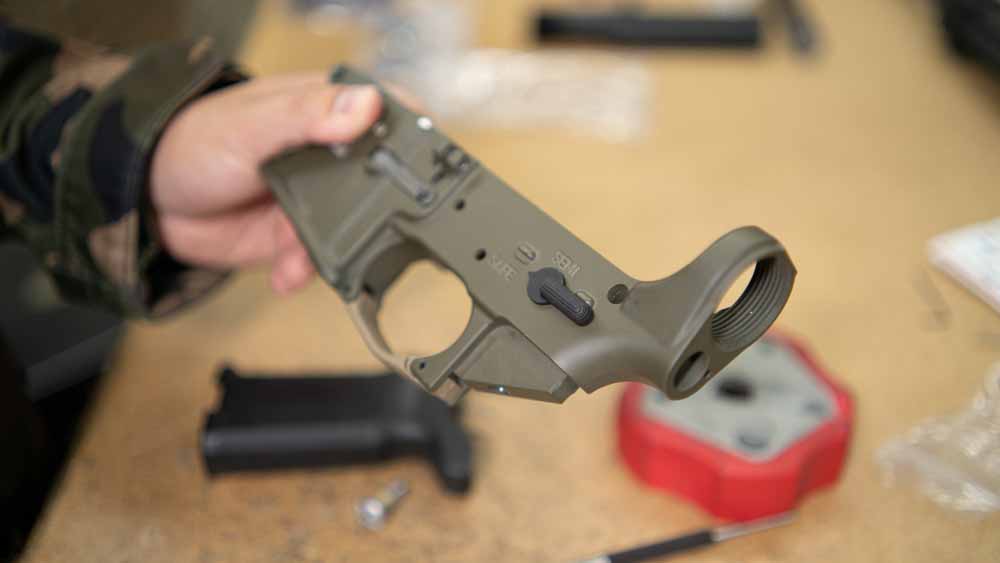
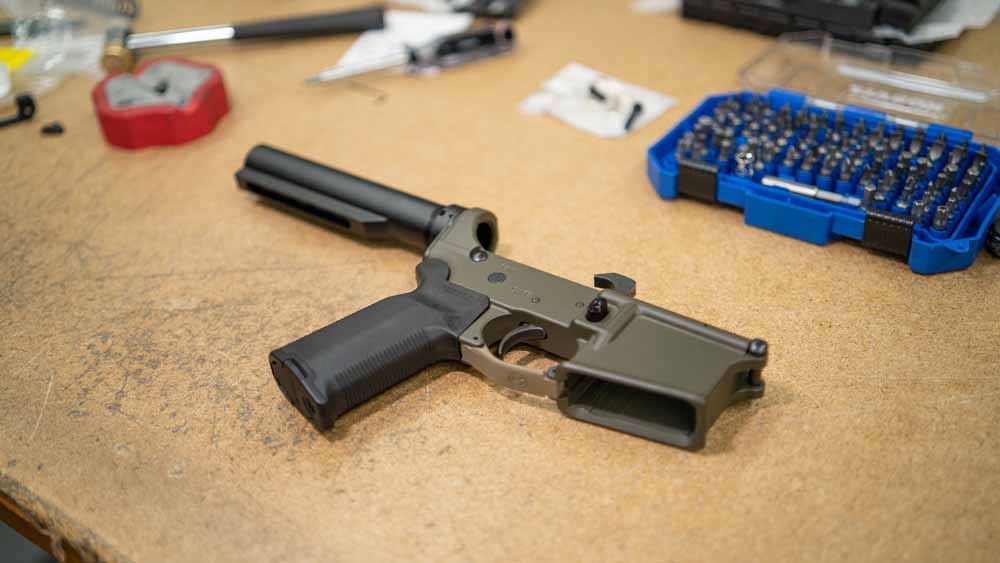
AR 15 LPK Installation Steps
In 7 simple steps, we’ll show you how to install your AR15 LPK with ease and finesse. With each consecutive build you’ll find your process will get faster each time. A quick caveat, everyone does this in their own steps and preference. By then end of this, you may find a develop your own process that works better for you too. This is simply how we do it, and in all honesty sometimes we go in the order of whichever parts are closest to us within our reach.
Step 1: Install the magazine catch and release button
First identify the parts you’ll need from the AR15 LPK for this step:
-Magazine catch
-Magazine release button
-Magazine button spring
Start by dropping in the mag catch on the left side of the receiver. Then drop the spring and the magazine release button on top of it in the right side of the AR15 80 lower receiver. Screw the button on by just a few turns to the right for now.
Now, take a punch and depress the spring behind the mag release button all the way down. You’ll need to do this in order to fully tighten the magazine catch on the left side of the lower receiver.
Screw it on by turning to the right (righty tighty, lefty loosey).
To gauge how much you want the mag release button to protrude from the receiver, release the pressure you apply from the punch. If you want the button to stick out more, depress it again, and loosen the mag catch by turning to the left and re-check the distance. Repeat the steps until you are comfortable with how it looks and feels.
If mil-spec mag release buttons aren’t doing it for you because you have smaller, grubby hands like me, you might prefer extended controls like our extended AR15 mag release buttons more to aid in smoother mag drops for faster reload transitions.
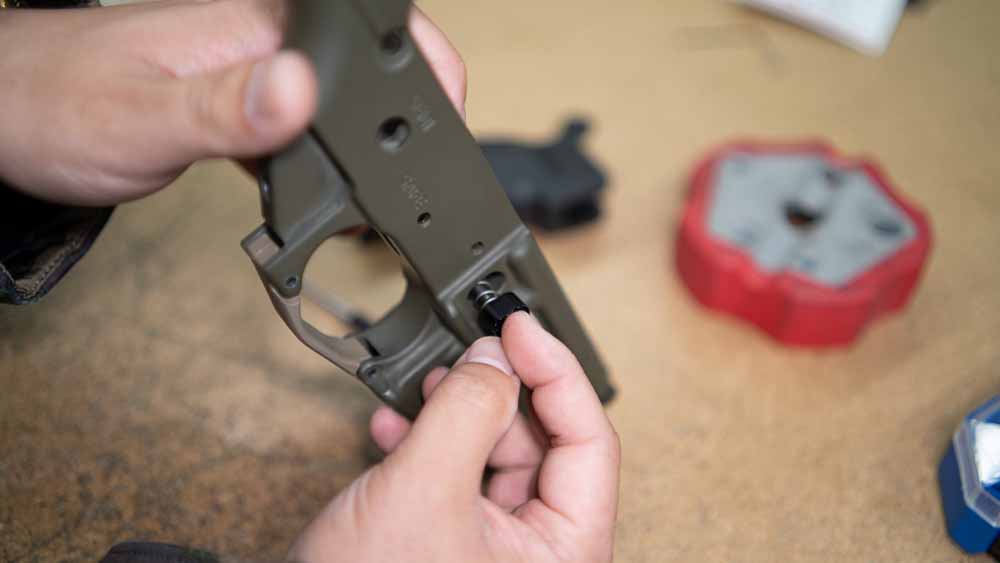
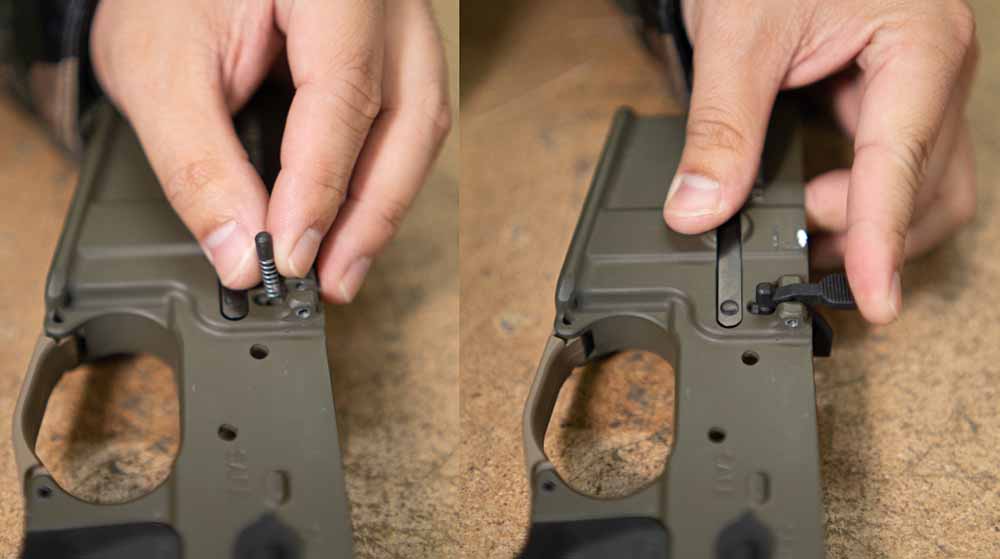
Step 2: Install the fire safety selector
*If you are installing a mil-spec trigger, you can install the safety selector first without a problem. However, if you plan on installing a drop-in trigger from the get go, you’ll have to install that first before the safety selector otherwise it will block the trigger group from being fully inserted. Mil-spec triggers come in pieces so there’s more wiggle room that allows you to maneuver and install around the safety selector within the trigger pocket of the lower receiver.
To install the fire/safe selector, these are the parts you’ll need:
-detent and spring
-pistol grip and screw
-safety selector lever
Start by inserting your safety selector into the lower receiver. If you’re using a mil-spec part made for right handed people, the left should be on the left side of the receiver. While holding the selector lever somewhat in place, drop the detent, pointy end first, into the lower receiver so that it’s pointing upwards.
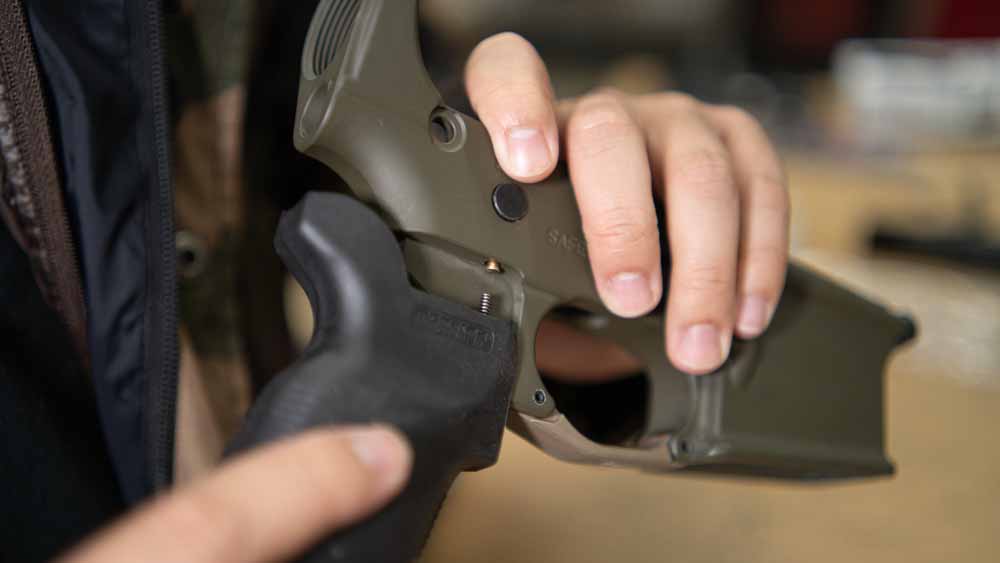
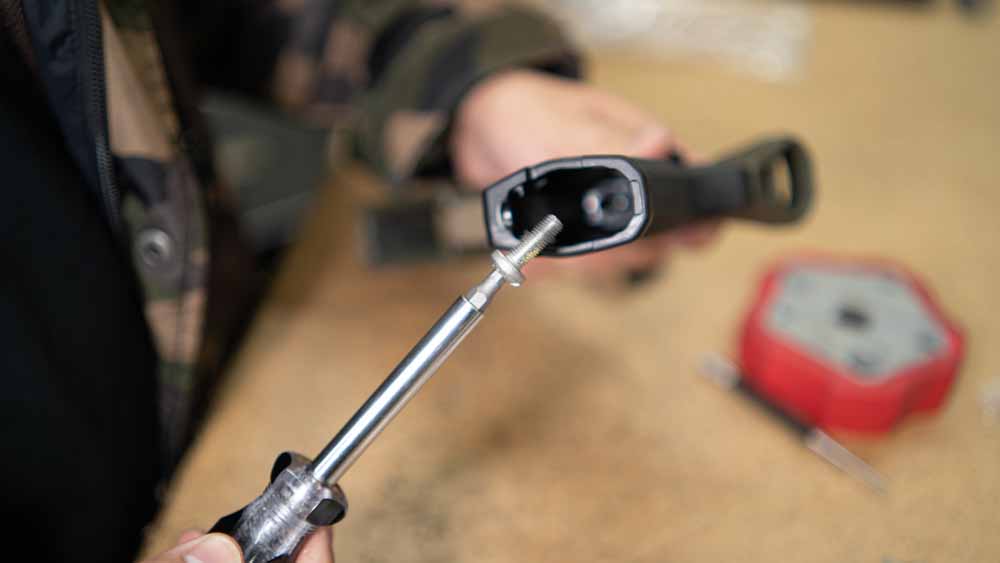
There will be a spring paired with it that goes into the pistol grip; using this we’ll be able to retain the detent in the receiver so that it doesn’t fall out. This holds the safety lever in place and provides that tactile ‘clicky’ feeling whenever you switch between ‘fire’ and ‘safe.’ To complete this step, screw in the pistol grip into the lower receiver by hand. Definitely get a good grip to do this but make sure to never over tighten to avoid the risk of stripping the screw or the lower receiver’s threads. If you’re using a Magpul pistol grip, you’ll need to take off the bottom cap to access the area where you can insert the screw.
The reason why we do this within the first couple of steps of the AR15 LPK install process is so that it makes gripping onto the lower receiver easier for the rest of the parts installation.
Step 3: Install Trigger (mil-spec)
Mil-spec triggers are not contained by a housing in the same way that drop-in triggers are which make it more difficult and seemingly daunting to install. In reality, it’s quite easy, you just need to get used to how these pieces all fit together like a puzzle.
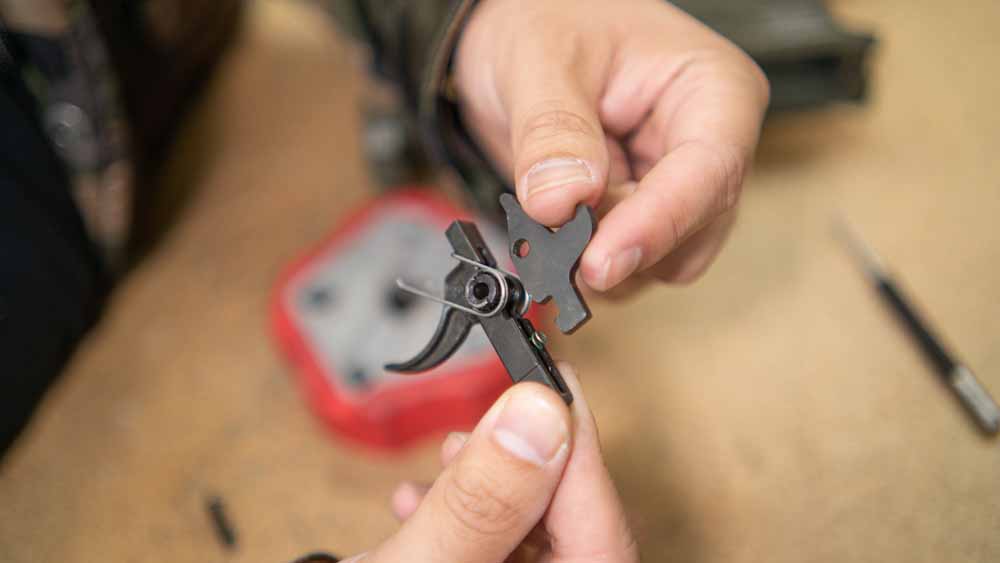
Start with the bottom half of the trigger group which has the actual trigger and a spring pointing upwards. Once you have that inserted into the lower receiver’s trigger pocket, you’ll have to take the disconnector and depress that spring we just mentioned. See how there’s a hole in the disconnector? Align that with the hole in the trigger bar while depressing the springs so you can gently hammer a pin through it. You may have to jimmy it a bit if you don’t have a second set of hands to help you.
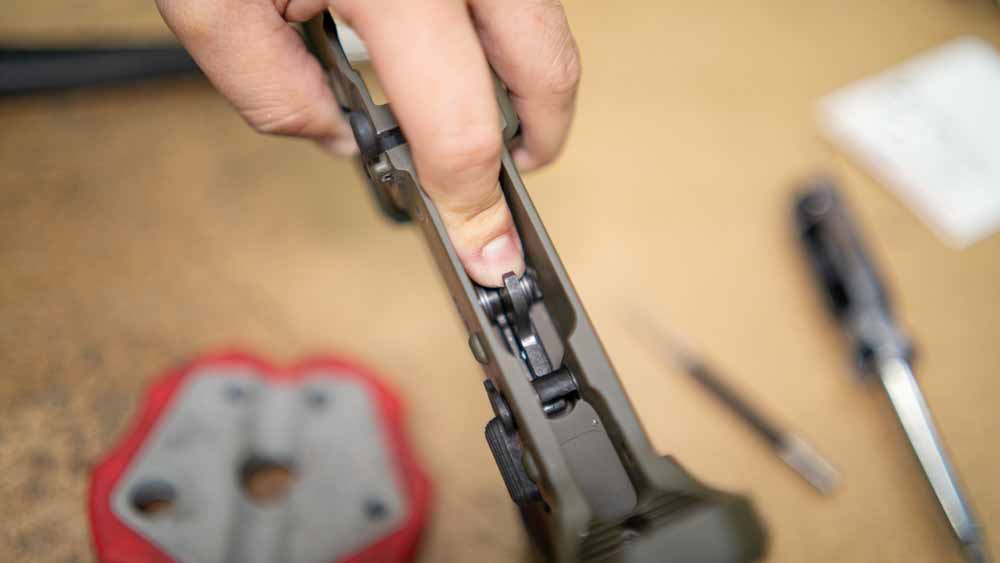
Once you have the bottom half of the trigger installed, we move on to the top half which is the hammer and its respective spring. Orient the hammer and its spring in the way you see it in the photo above as you depress this part on top of the lower half of the trigger that’s already pinned in place.
When you have the hammer’s hole lined up with the remaining hole in the lower receiver, you can use a punch to stick it in there as a placeholder. Don’t insert the punch too deep as we want to leave room on the opposite side of the receiver to insert a pin. Using a punch just makes all of this far easier when you’re doing an AR15 LPK install alone. Once you have a pin installed part of the way you can slowly remove the punch and gently hammer the pin all the way through.
Keep in mind that you’ll have to apply downward pressure on the hammer and its spring to be able to align the pin hole with the holes in the lower receiver.
Install trigger (drop-in)
They don’t call it a ‘drop-in’ trigger for nothing. Quite simply, you drop in the trigger housing, install the locking pins to hold it in place within the lower receiver’s trigger pocket and you’re done. Just make sure you install your AR15 drop in trigger before you put in the safety selector.
If you’re worried about the pins “walking” then we highly recommend the CMC anti-walking pin set. I personally use them on all of my builds and they are well worth it for that peace of mind and having to worry about one less failure point.
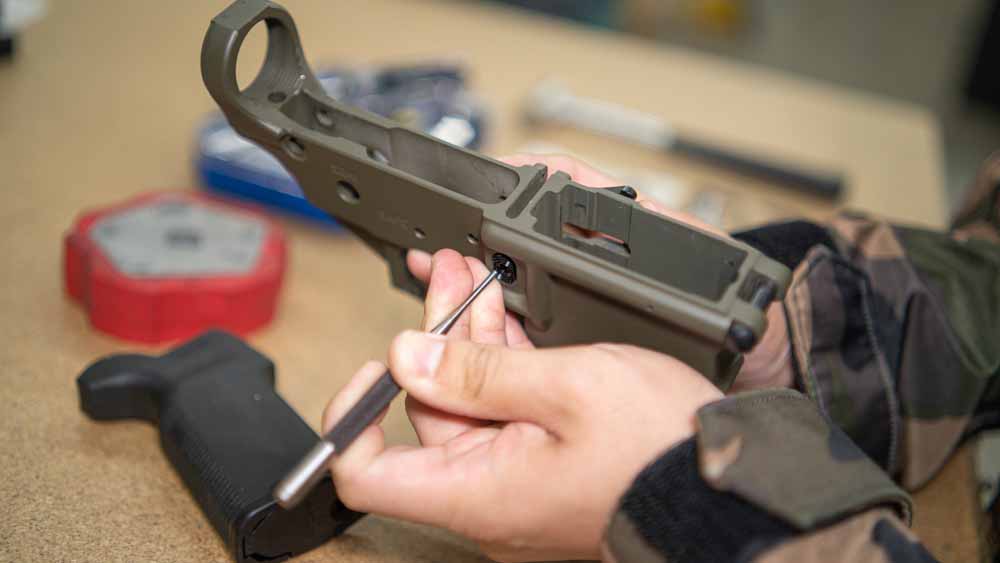
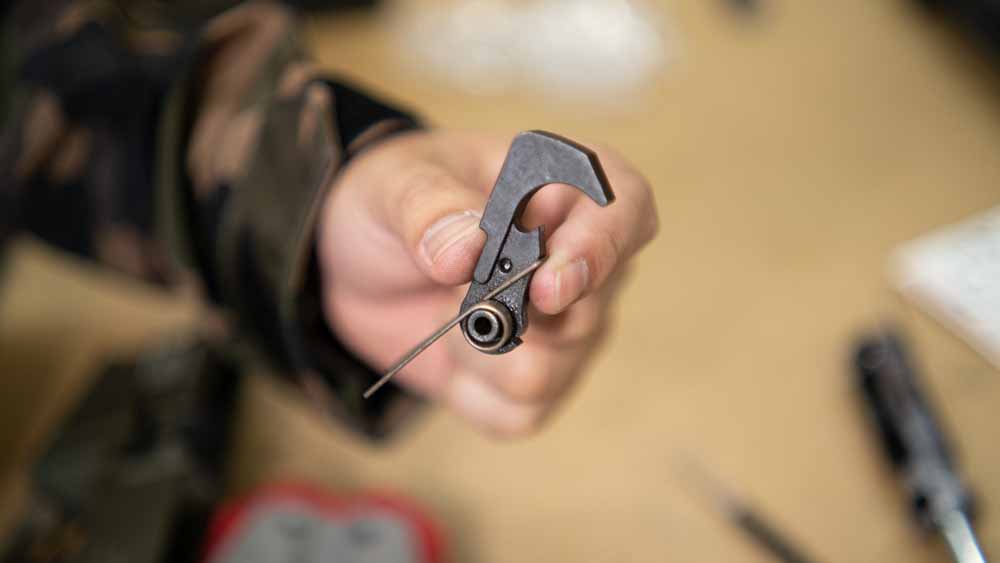
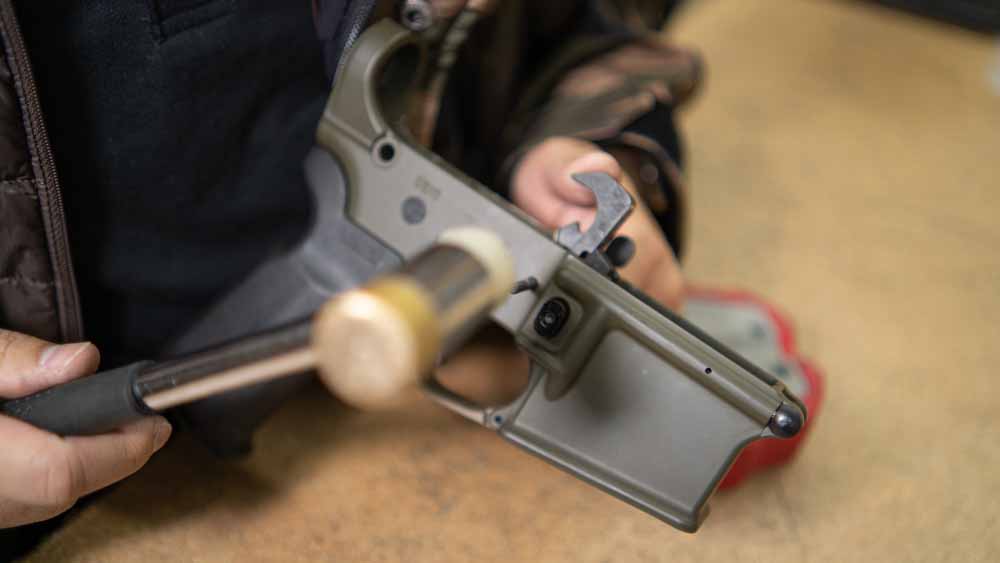
Step 4: Install bolt catch
Depending on your lower receiver, this can be kind of tricky. If you don’t do this well, you can easily marr the paint on your lower receiver as can be seen in the photo above. To help avoid that, we highly recommend our Classic 80% AR-15 lower receivers.
These are the parts you need to install the bolt catch:
-bolt catch lever
-spring
-plunger
-roll pin
First, drop the spring into the bolt catch’s hole with the plunger on top of it. Then, carefully hammer the roll pin partially into the hole on the side without going all the way through to leave room for the bolt catch lever. Next, while depressing the bolt catch lever down towards the plunger, align the hole in the metal with the lower receiver’s pin hole. Hammer the roll pin all the way through the bolt catch until it is being held in place and the pin is flush with the edge of the hole in the receiver.
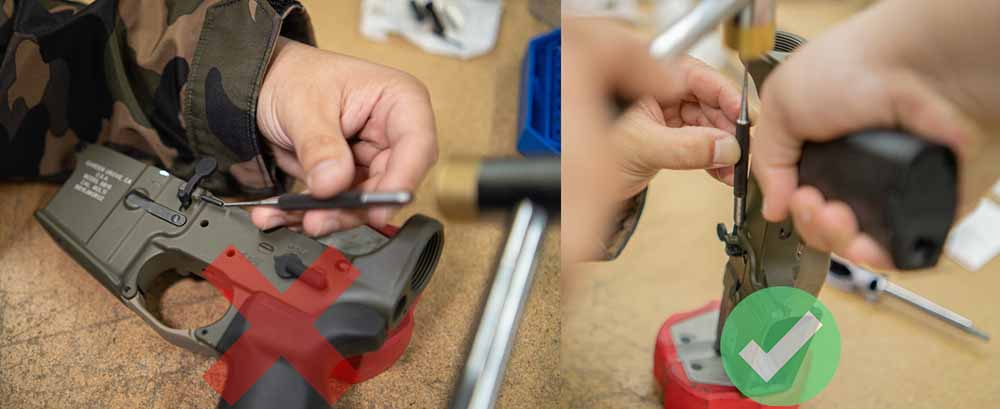
Tip: Pretty easy step, but can take a good amount of time because the parts are so small and the roll pin’s hole is also tiny. We recommend hammering the roll pin in by using the back of a brass punch to evenly distribute force into the hole. If you use the thinner end of a punch you run the risk of accidentally opening the roll pin which would ruin it and render it unusable. If you have any issues with having the bolt lock back, sometimes using a Magpul BAD lever can help. We didn't have one on hand at the time but the best tool would be a roll pin punch. This is the best tool for installing a non-threaded bolt catch pin because its a punch with a nipple which keeps the roll pin centered and can be hammered down on without risk of accidentally deforming or flaring out the roll pin so long as you have the correct size.
Step 5: Install buffer system (extra)
As a reminder, an AR15 LPK only includes the buffer retainer kit which is a spring and a plunger which has a small nub that catches onto the buffer weight (sold separately) keeping it within the buffer tube. More on this in a bit.
Parts you’ll need to complete buffer system installation:
-mil-spec buffer tube
-buffer spring
-buffer weight
-end plate
-castle nut
-spring and detent for rear takedown pin (included in AR15 LPK)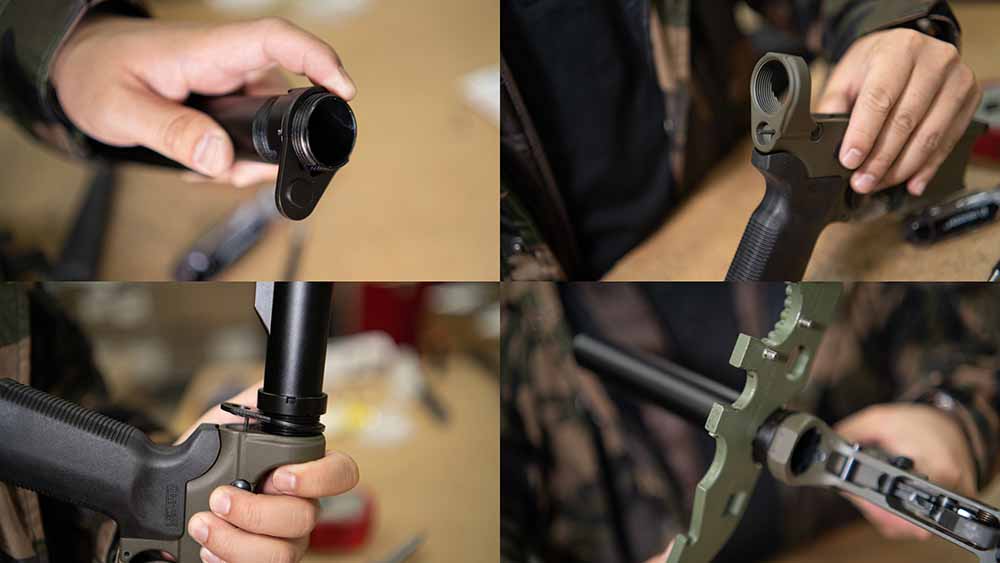
Start by sliding the rear takedown through its holes and make sure it's seated all the way. Next, drop in the detent and very thin spring in the small hole that’s on the rear face of the lower receiver. We’ll be using the end plate to smash the spring down to hold it in place. This is where using a thin flat head screwdriver will come in handy to make it easier to seat the end plate properly without damaging the spring or bending it in the wrong way. Notice how there’s a hole in the back of the lower receiver and there’s a bump in the end plate which fits in it perfectly.
To make this go smoother, put both the end plate and castle nut partially onto the buffer tube first and partially thread the buffer tube until it is properly aligned. Hint: do not let the buffer tube go past the hole as that would block the buffer retainer pin. While continuing to apply pressure to the end plate (seriously, do not let go) you can use the castle nut to tighten down on the end plate which keeps it in place. To really make it stay in place without ever needing to worry about it again, you’ll need an armorer’s wrench to crank that down. If you plan on never tweaking these parts again, take a punch and hammer it downwards on the castle nut to “pin it” in place. In my personal experience this isn’t really necessary but it is known as common practice.
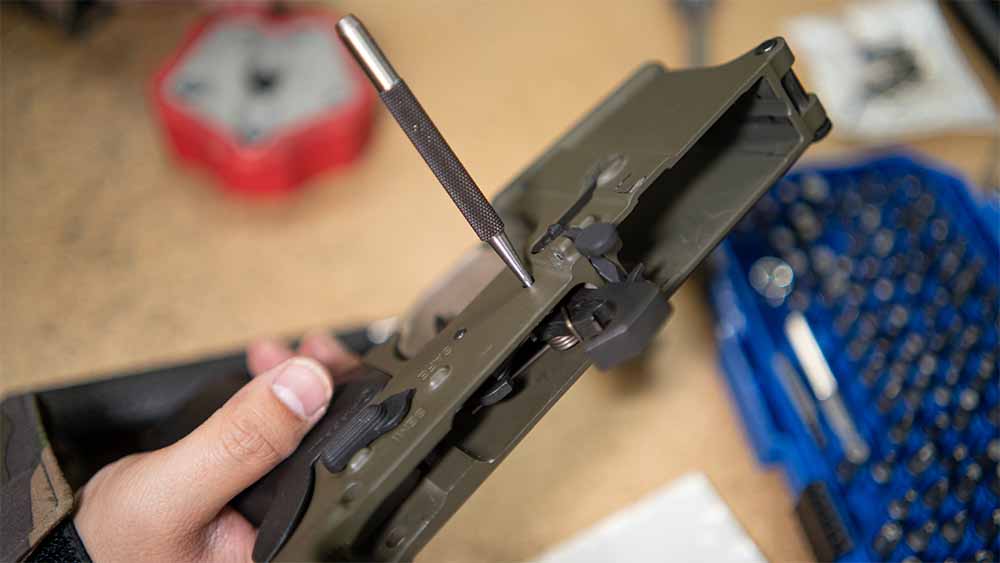
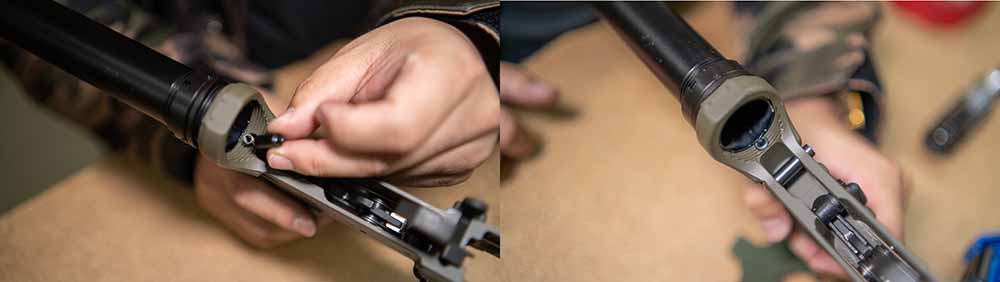
Step 6: Install takedown pins

We’ve already installed the rear takedown pin so all that’s left is the front takedown pin. To do this you should be familiar with detents and springs by now. So the only difference this time is that we put the spring in first, then the detent. This is another case where a thin flat screwdriver will come in handy. You’ll need to use the flat head to depress the detent into the hole and slowly remove it as you slide the takedown pin in.
Step 7: Install trigger guard (if necessary)
Occasionally, we’ll have 80% AR15 forged lower receivers go on sale and the lower we used for this blog is one of them. With forged lowers, they do require a separate purchase of a trigger guard. The benefit of buying one of our classic or new ambi billet 80 lowers is that the trigger guard is part of the lower receiver’s design which saves you some money. In this case I had a Magpul trigger guard lying around which was an easy install. All you do is screw in three different screws on the left and right sights of the polymer to set it nice and tight.
Grab an AR15 lower parts kit and complete your lower with 80 Percent Arms today!
That’s it! You’re all done with your complete AR15 LPK install. If you’re just learning how to do this but haven’t purchased a lower parts kit yet, take a look at either our AR15 mil-spec lower parts kit or the CMMG gun builder’s LPK which does not include the pistol grip but has the rest of the internal parts.